


The problem that we bloggers have in our heads is "display speed".
If you add too many images to your blog post, the image size will significantly slow down the display speed and reduce usability.
In fact, statistics show that 40% of people give up reading an article and leave the page if it takes more than 3 seconds for a website to load.
In other words, when running a blog,Speed up your site's display speed by compressing WordPress imagesIt is necessary.
This article also introduces it to this blogWordPress Image Compression Plugin ShortPixel I will explain how to use it in Japanese.
- 1 Why You Should Compress WordPress Images
- 2 What is ShortPixel
- 3 Pros/Cons of ShortPixel
- 4 How to use ShortPixel and how to set it up without failure
- 5 ShortPixel Pricing & Pricing Plans
- 6 How to purchase additional plans on ShortPixel
- 7 Can ShortPixel be used in Japan?
- 8 Conclusion: My ShortPixel Review Summary
Why You Should Compress WordPress Images


The biggest advantage of image compression is thatIt will improve the loading speed of pages on your WordPress website.As a result, visitors can read your blog posts without stress, which leads to fewer churns.
By reducing visitor churn, you will increase the probability that other articles on your blog will be read (circulation rate). Also, by reading other articles, the profitability generated from the blog may also increase.
Let's say it clearly. To improve the display speed of your blog, start with "image compression and optimization".
In this article, we will introduce you to a tool that optimizes all images in WordPress to dramatically improve display speed. Its name is alsoShortpixel。
In this ShortPixel review, as a heavy user who has been using this tool for several years,
- How ShortPixel can actually reduce weight on heavy images
- Can you improve loading times?
- How effective is image compression?
I will explain these stories one by one.
What is ShortPixel


If you have a lot of images on your WordPress site, then you can use ShortPixel to compress the file size of your images and dramatically increase your website's display speed.
ShortPixel is an image compression plugin developed by a team operating in Romania.
This plugin compresses images tightly with almost no loss of image quality.
ShortPixel image compression types
The ShortPixel I use offers three types of image compression.
Some people want to compress images while maintaining high image quality, while others want to compress images thoroughly.
You can choose the image compression type that suits your needs.
- Lossy:This is the compression type recommended by ShortPixel. Among the three image compressions, it can compress the most and reduce the weight of the image. It is not obvious at first glance with the naked eye, but it seems that the extremely fine parts of the image become rougher.
- Glossy:It is the second highest compression ratio among the three. You can achieve reasonably high image compression while maintaining high image quality
- Lossless:It is low compression while maintaining ultra-high image quality.
Lossy is ultra-high compression. Compress the file size of your image in one go. Still, the human eye does not see any difference from the original image. Please see below.
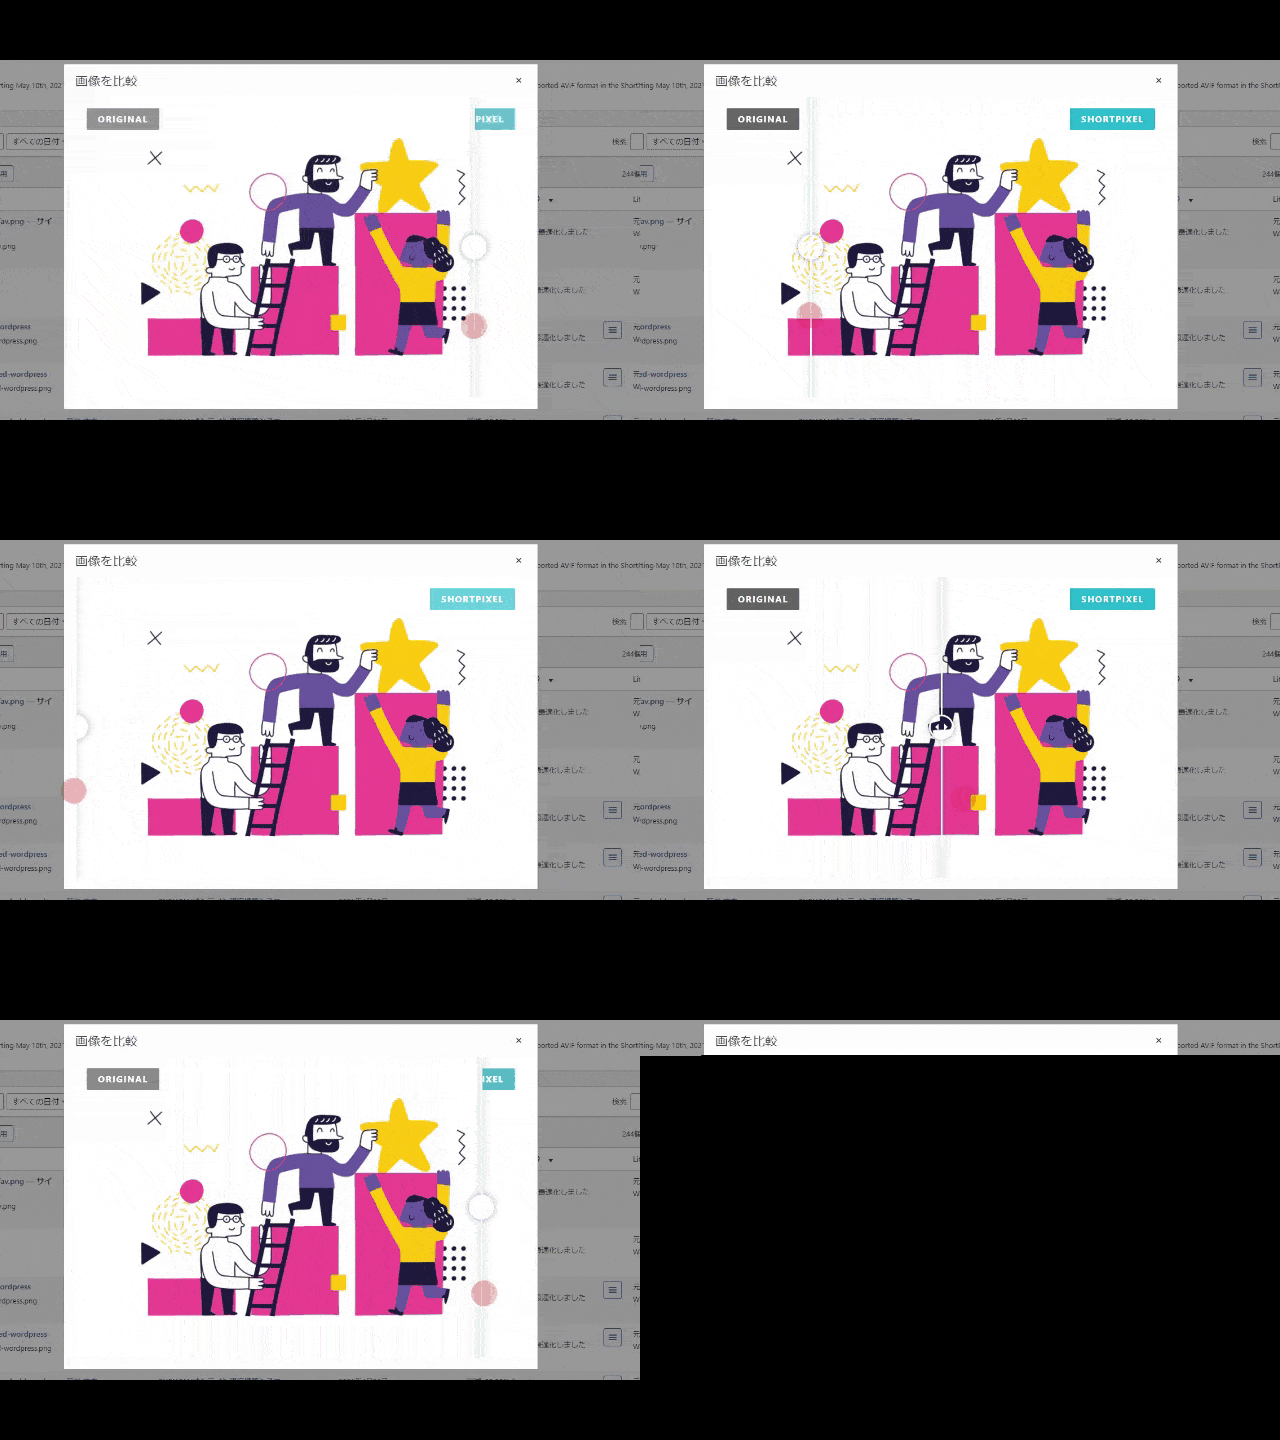
Here's an example of running ShortPixel's Lossy on my website. How about this? With the naked eye, you can hardly see the difference.
Still, the file size of the image is

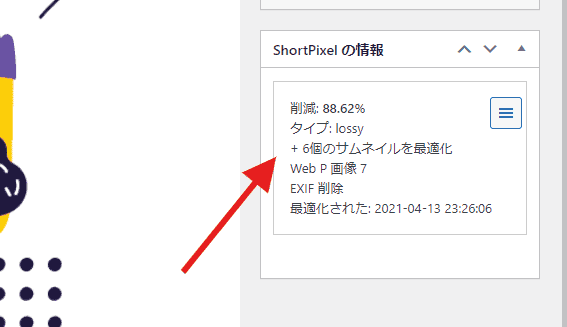
Surprisingly, it has decreased by 88.62%.
In this way, you can reduce the file size by tightly compressing the image while maintaining the image quality.
ShortPixel is recommended for people like this
Let's say it clearly. If you have WordPress, you should definitely use it.
ShortPixel can compress images on any website, from small to medium to large sites that are still just launching.
Therefore, it may be strange to say, "ShortPixel is recommended for these people." I'll list them quickly.
- Using WordPressPeople
- People who want to lighten their images
- People with slow site speed
If the above applies, or if you read my site regularly,I can definitely recommend ShortPixel.
So, what are the benefits of using this tool?
Pros/Cons of ShortPixel
Before we actually review ShortPixel, let's summarize the pros and cons of ShortPixel.
The advantage of ShortPixel is not only that it can super-compress images while maintaining image quality without losing quality.
There are benefits that I can see because I have used ShortPixel overall.
On the other hand, there are some disadvantages that you may continue to use and say, "To be honest, it's a small detail, but I don't like this one."
I will introduce it at once without hesitation.
Pros of ShortPixel
- Throw all the image optimization around
- Ultra-compressed while maintaining image quality
- Dramatically improve site display speed
- Peace of mind with backup function
- Conscientious Pricing Plans
- Easy Setup
WordPress image compression plugins have settled on ShortPixel.
Just put it in and activate it, and you can throw away the image compression and weight reduction. The benefits of using it are great.
Disadvantages (cons) of ShortPixel
On the other hand, we will also introduce the disadvantages (disadvantages) of ShortPixel.
- Having to set up an API key
- Manually delete backups
I will explain them in order from the top.
First of all, ShortPixel will not work unless you first enter the API key.

API keys are easy to obtain. How to get it will be explained later. You can get it in 3 seconds.
We will also discuss backups. ShortPixel automatically generates backups in case of a fatal problem and the image fails to compress.
It is true that thanks to backups, you can compress images with confidence, but if you have too many backups, the server will be overwhelmed.
So, you need to delete the backup if you like.


Just press the button. You can remove it from Settings → ShortPixel ⇒ Statistics in your WordPress dashboard.
Both disadvantages are easily eliminated. However, if I had to say it, it would be a disadvantage.
How to use ShortPixel and how to set it up without failure
I will explain it with images.
Please try setting it up while watching the steps. It only takes 3 minutes to deploy ShortPixel and you're ready to go.
(1) Add and activate a new addition from the WordPress plugin
Search for ShortPixel → WordPress admin under Plugins → Add New.

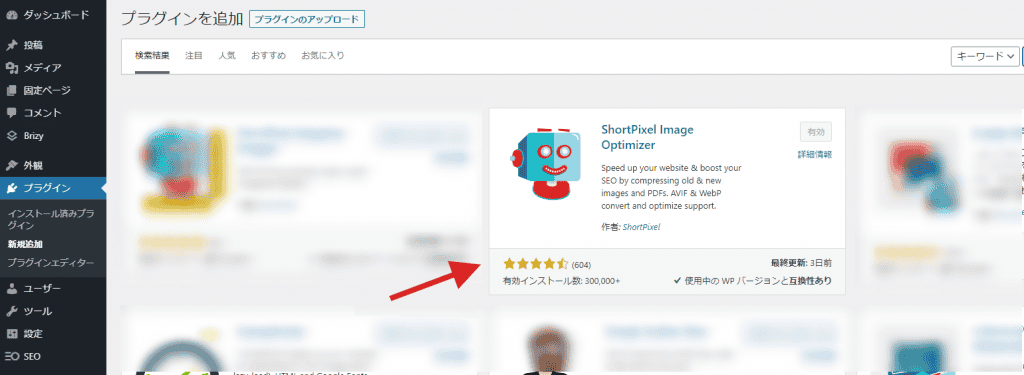
Then the ShortPixel Image Optimizer will appear. Install & Activate.
Next, quickly get the API key.
(2) Get the API key for ShortPixel
Get ShortPixel's API pageClick the button that says "FREE SIGN UP". Please see the image below.


When you click the button, you will be asked to enter your email address.


Please enter your email address and check the box below. After that, click on the "SIGN UP" button.

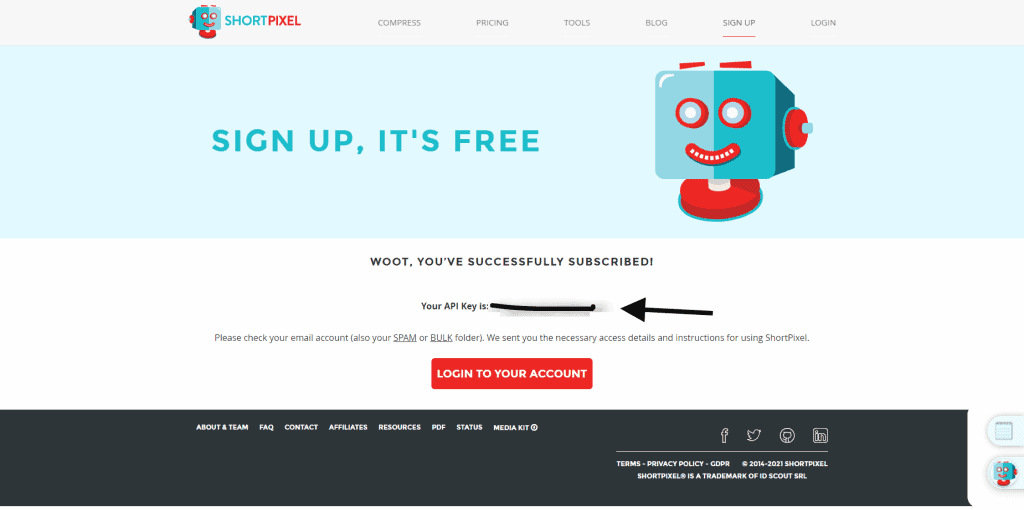
Doing so will generate an API key. Use this API key.
(3) Enter the API key
Let's take a look at how to enter an API key.
Go → WordPress admin to Settings → ShortPixel to enter your API key.

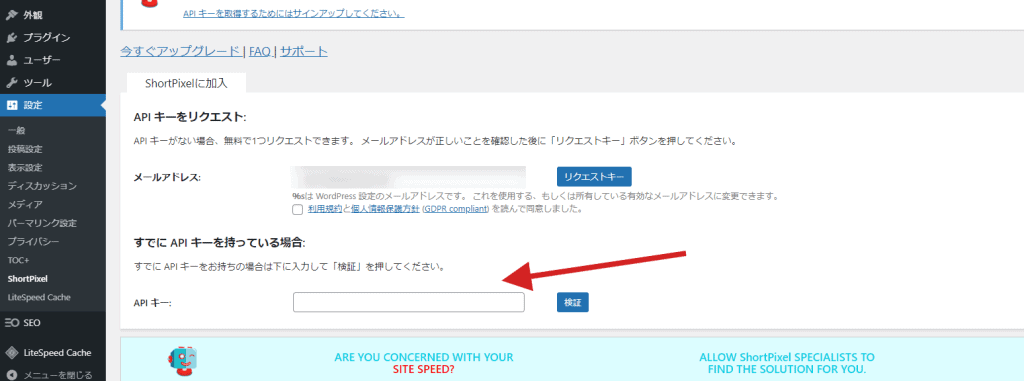
Enter the API key you got in this part and click the 'Verify' button. Your API key should now be authenticated.
(4) Set up ShortPixel
Next, configure the ShortPixel settings.

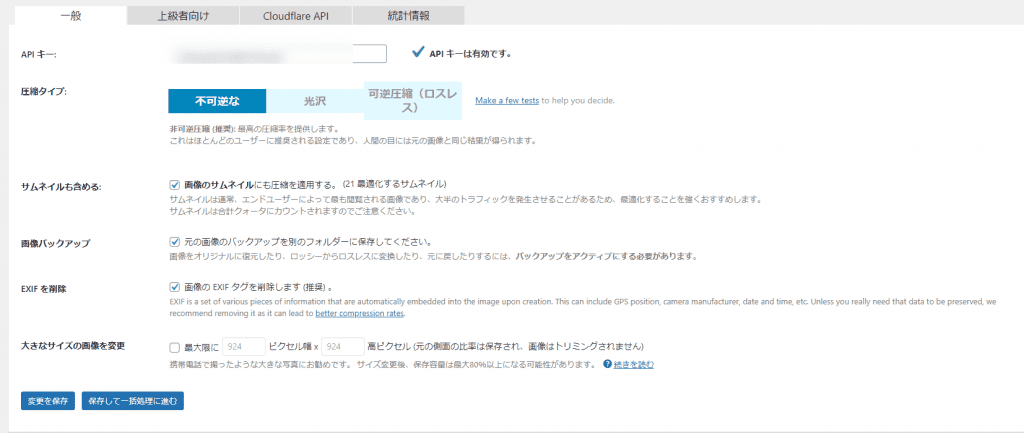
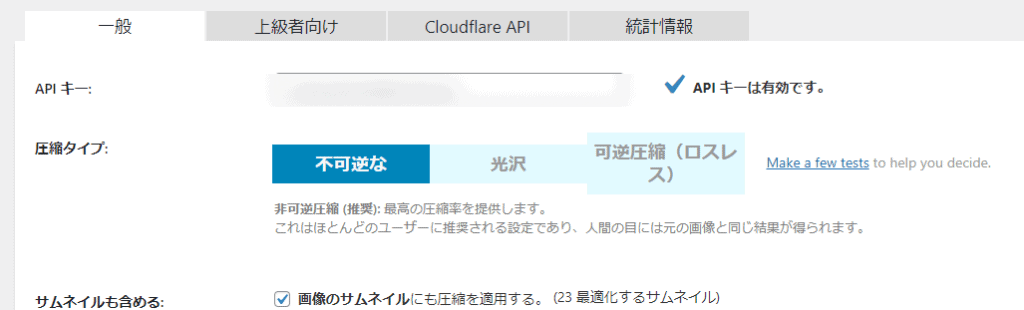
Compression Type:For recommendations, please refer to the following for "Lossy".
- Ultra-compressed images to reduce weight "Lossy"
- If you want to maintain high image quality and have a reasonably high image compression, you can use "Glossy"
- If you maintain ultra-high image quality and low compression, "Lossless"
By the way, I am "Lossy".
- Thumbnails include:Check it out
- Image Backup:Check it out
- Remove EXIF:Check it out
- Change large size images:Unchecked
Now let's [Save changes]. Next, set it up for advanced users.


You don't need to set up much here. Let's take a quick look.

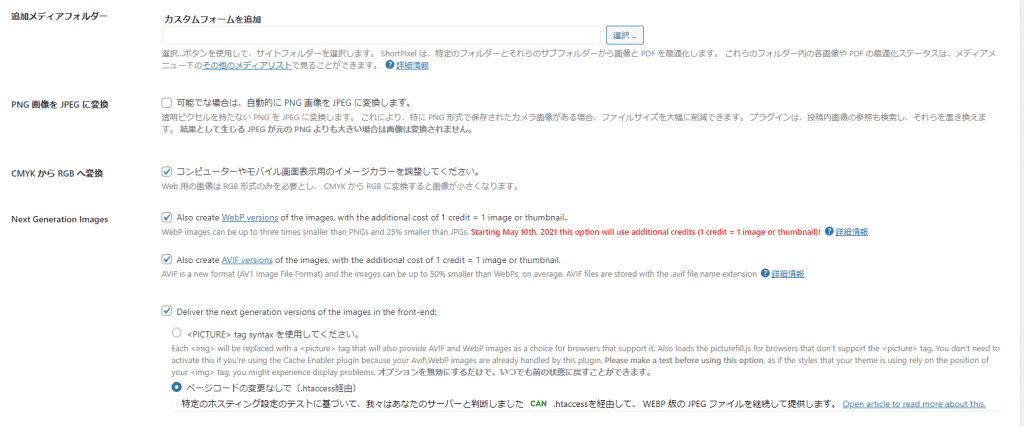
Additional Media Folders:OK in the blank
Convert PNG Images to JPEG:Don't check
CMYK to RGB Conversion:Check it out
Next Generation Images:This is free.
To put it simply, the meaning is the next generation image format.
It asks if you want to display it in an image file format that can be viewed even faster, rather than in JPEG or PNG format. If you say, "I don't understand," you can do without checking.
Let's continue to set it up.

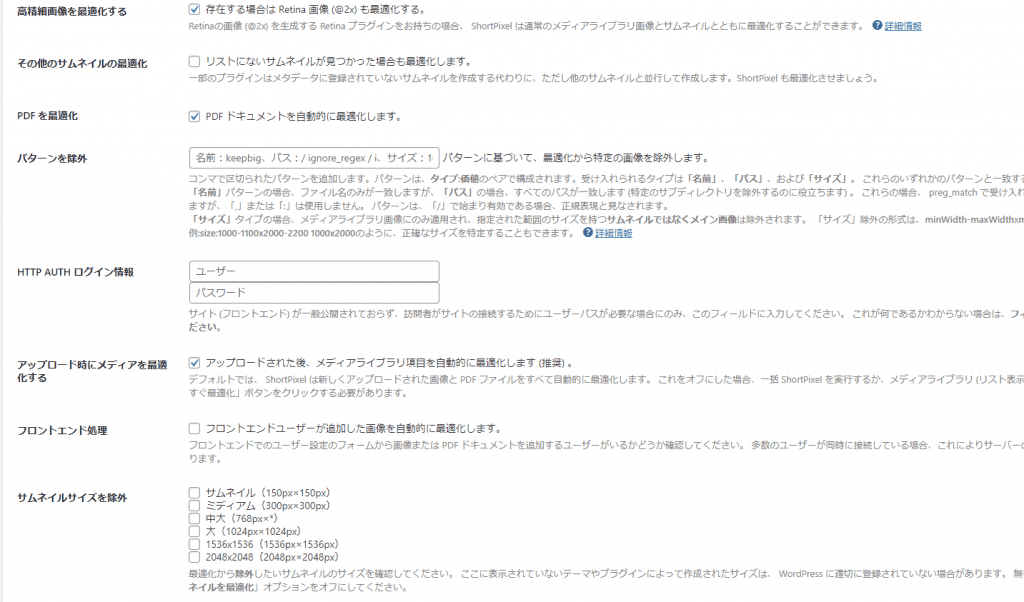
- Optimizing High-Definition Images:Check it out
- Other thumbnail optimizations:Don't check
- Optimize your PDFs:Don't check
- Exclude patterns:OK in the blank
- HTTP AUTH login information:OK in the blank
- Optimize media when uploading:Check it out
- Front-end processing:OK in the blank
- Exclude thumbnail size:Normally, you don't need to check it.
Check it out if you want to optimize your PDFs as well. That's why I'm putting it in.
(5) Actually compress the image

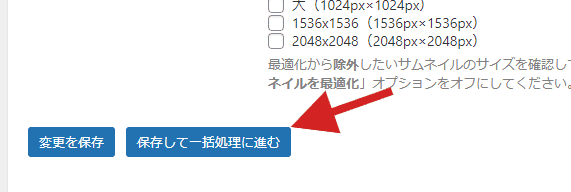
Yes, once you have set it up, click Save and proceed to batch processing.


ShortPixel image compression begins.
ShortPixel Pricing & Pricing Plans
Of course, SHortPixel is free to use.
However, the 100-image limit per month is probably not enough. If you have a lot of images to compress, we recommend purchasing ONE-TIME (whenever you need it).

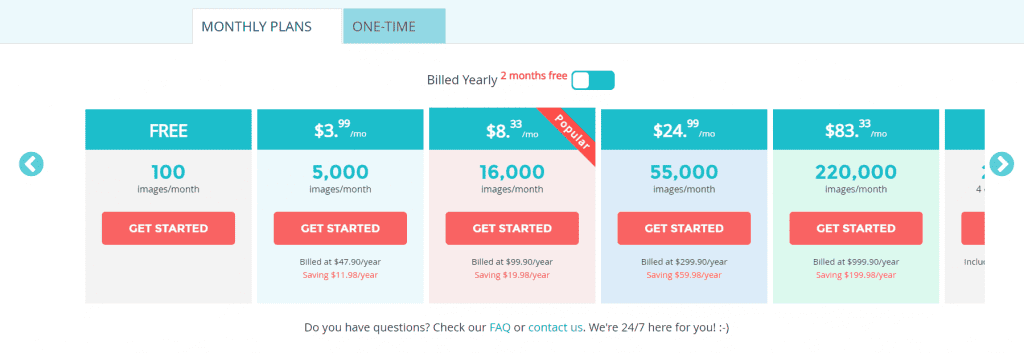
There are two pricing plans.
- MONTHLY PLANS
- ONE-TIME (whenever needed)
If you want to upload nearly 5000 images to your site every month, you can start with a monthly plan of $4.99...
However, I personally recommend ONE-TIME.
This is because with ONE-TIME (whenever you need it), the credits you purchase will not be wasted. It does not expire.
Therefore, if you are a small site, we recommend purchasing it with ONE-TIME. See below for an easy-to-understand explanation.
How to purchase additional plans on ShortPixel
You may need it, so we will explain the payment methods and procedures.
… You may get lost because it's in English. If you follow these steps, there is no problem.
(1) Choose a plan
FirstOfficial pricing pagePlease see.
Decide on a plan based on the number of images you want to compress from the pricing plan.
If you want to compress 10,000 images, choose 10,000 images from ONE-TIME (one-time).

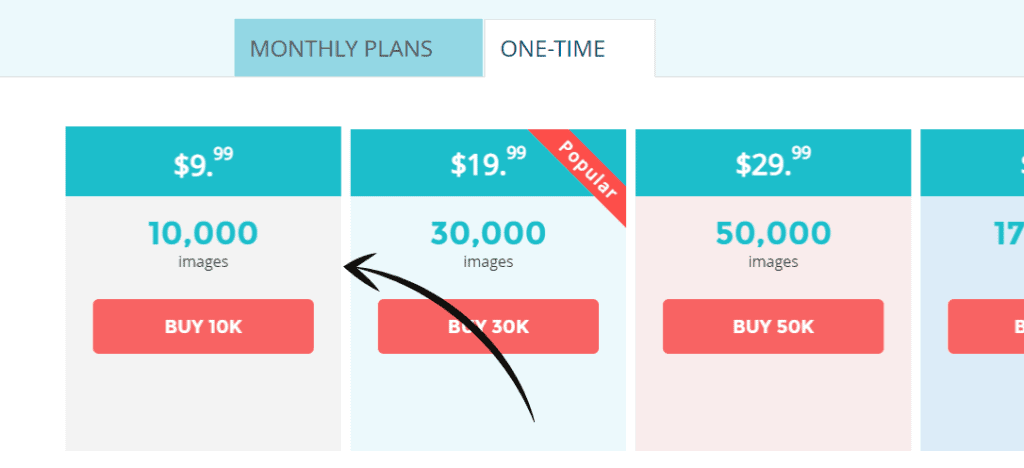
Click on the button that says "BUY 10K".
(2) Enter your payment information

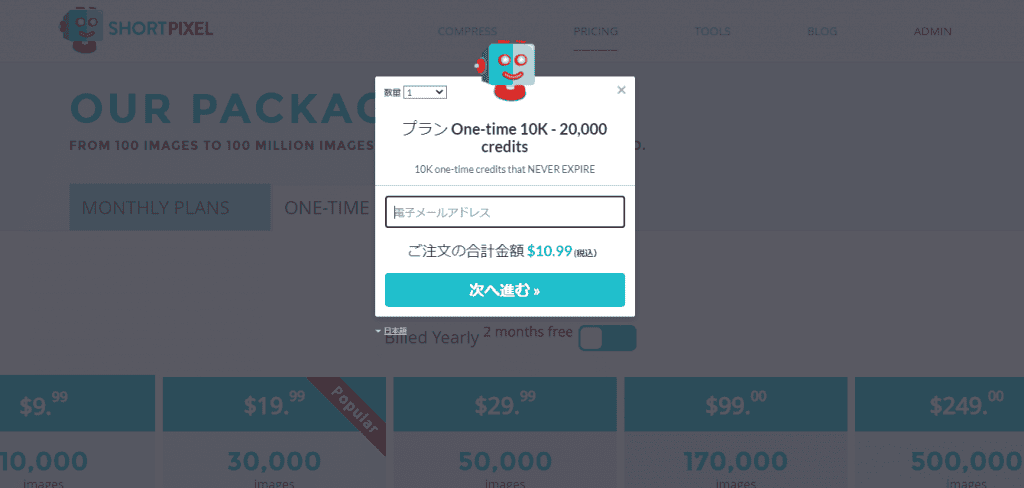
First, enter your email address. After payment to the email address you entered here, you will receive an order completion email from ShortPIxel.
Once you have entered your email address,

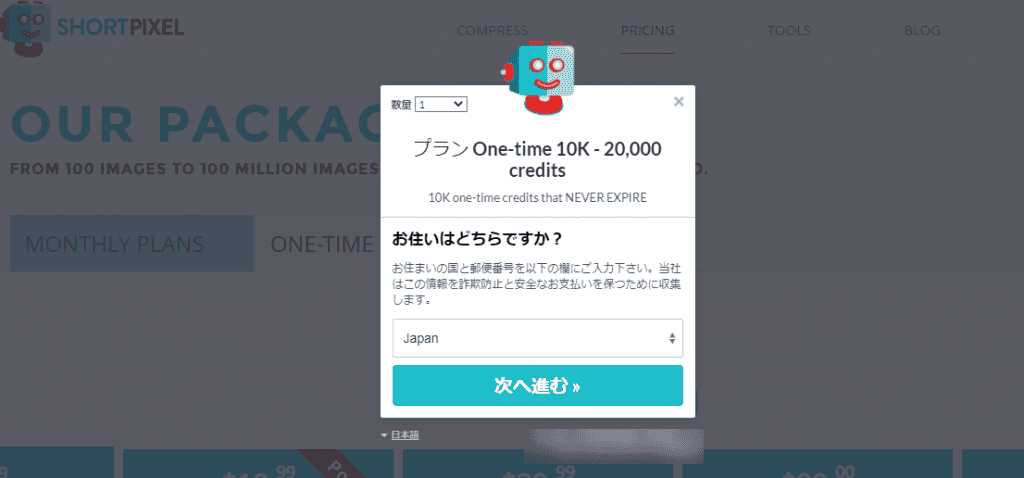
Make sure that the country you live in is "Japan".
Click the button to "Next".


The total amount is expressed in dollars. There is no problem. At the payment stage, it will be automatically converted to Japan yen.
Choose your payment method here.
- Pay by credit card
- Pay with PayPal
There is no problem with cards. However, if you are worried about paying on an overseas site, you can pay with PayPal.

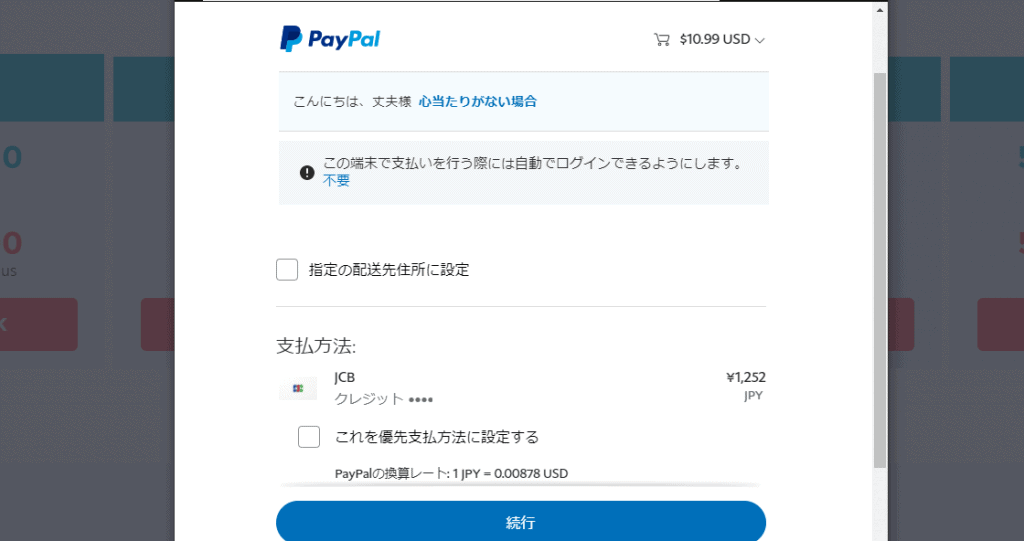
The PayPal screen will open. Here it is converted to dollars ⇒ yen. $10.99 is converted to 1,252 yen.
If you think that you can super compress 10,000 images and speed up the site display speed, it's very cheap. Now, if you click the button that says "Continue", you will be able to settle as it is.
In the case of ONE-TIME (one-time only), there is no charge thereafter. It's not a flat-rate plan, so you won't be billed every month. Please feel free to use it.
If you're a content creator who struggles with slow site loading and display speeds, you should definitely give ShortPixel a try.
Can ShortPixel be used in Japan?
Yes. You can use it in Japan without any problems.
ShortPixel is also included on this site. It is also available in Japanese, so you can use it on WordPress without stress.
Try ShortPixel for free and risk-free to get started.
Even with the free plan, the image compression ratio is the same as the paid version. The free version allows you to compress up to 100 images per month.
No matter how good the content you provide on your blog, if the page is heavy, visitors will leave. Don't you think this is a considerable lost opportunity?
Simply compress WordPress images and your quality content will reach the people who are looking for it. ShortPixel is the best way to do that.
You can compress 100 images per month for free. For small sites, even if you compress 100 sheets, the display speed will be dramatically improved.
By all means, let's get started with ShortPixel for free.
Conclusion: My ShortPixel Review Summary
By using ShortPIxel,You can compress all images in WordPress.
However, as you know, there are other ways to just compress WordPress images. I like that ShortPixel can dramatically reduce the file size of images without losing image quality.
If you have a lot of images on your site, ShortPixel can easily improve your site's display speed at once.
The site currently has 246 images. By using ShortPixel, you can

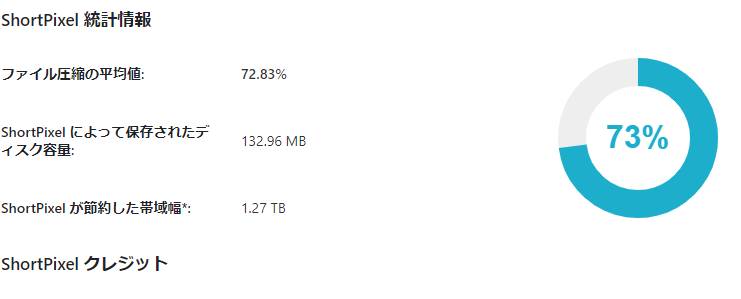
On average, 72.83% of image files are compressed. As a result, my website page speed is currently as follows:


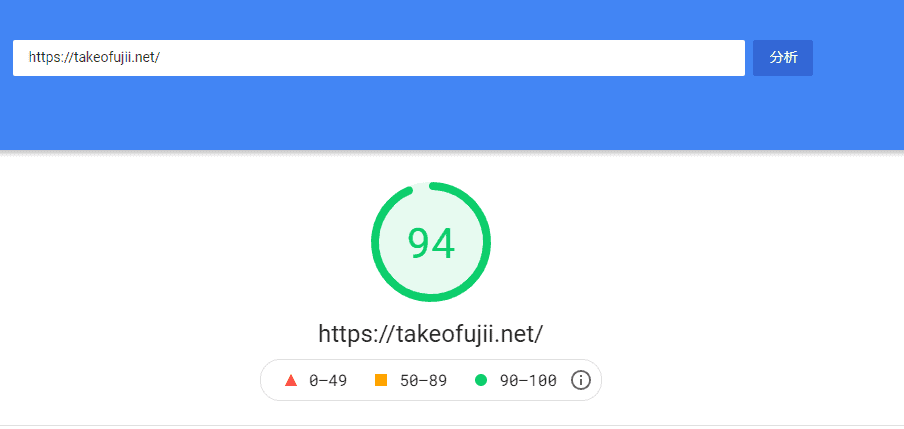
In this way, it has dramatically improved the display speed of the site.
When your site's display speed increases, visitors can focus on reading your articles without stress, which reduces their abandonment rate and encourages them to read other articles on your site.
How about the WordPress image compression plugin ShortPixel? [My thoughts]
Yes, I assure you. should be used.
Whether you're using another image compression plugin or haven't done any image optimization yet, try using ShortPixel either way.
If you want to dramatically improve page load times to minimize the file size of your images while maintaining high image quality, ShortPixel is the best choice.
It is a very excellent tool that we also use on this blog. I recommend it with confidence
Try it for free first. You can use up to 100 sheets per month for free.
Charges will start suddenly and your credit card will not be charged, so please feel free to try it.
If you have any questions about SHortPixel, write them in the comments section below the blog. I might be able to answer as a single user as well. We will answer as quickly as possible.
See you soon.
















Latest Comments